
CrawlFit – Crawl before you start to WOD (Part 1 of 3)
Although my main focus on this site is what fuel we should put into our body. There’s no doubting that how we spend our fuel is just as important. This particular page is the result of a request from a particular family member, who wants more on what she should do on the fitness side of the fence.
I’m going to discuss three basic moves that are very important building blocks into all of your future Workouts Of the Day W.O.D., oh ya that’s the meaning of WOD that you see throughout my site. Three fundamental moves that we will start with are:
- The Air Squat,
- We need to understand the benefit of doing an air squat in the first place. It’s that thing we do, you know, sit-stand-sit, just there’s no remote in your hand. Bet you do squats everyday, you know that thing at a bare minimum you should be sitting on at least once a day? You find it in you bathroom, ah you got it now 😉 and I hope your going at least once a day, or 24 to 72 hrs per meal.
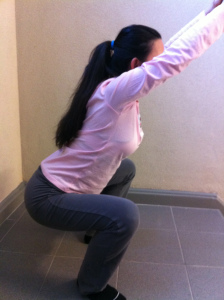 First off, the proper form for the Air Squat is your stance is shoulder width apart with the hips and knees at full extension. With your centre of balance travelling through your heals, chest puffed up and maintaining a proper lumbar curve, as you begin the descend into the squatting position your butt will begin to travel back and down.
- The bottom of the squat is reached once your hip crease is below the top of your knees and your knees will be parallel to your feet.
- This is when you will return back to the full extension of the hips and knees, thus completing the Air Squat.
- If you have difficulty going so low practice going low enough so your thighs are parallel with the ground. If this is still too difficult, do this workout on a chair.
- Moving onto the Shoulder Press,
- Take a stance so that your feet are hip width apart. With your hands just outside of your shoulders and broom handle resting on what we will call your rack (created by your shoulders) and hands holding with a close grip. Elbows will be pointing down, midsection tensed up.
- You will then press the bar straight up overhead, locking out the arms with your armpits facing forward. Caution, don’t hit your face with the broom handle, its OK to move your head out-of-the-way, just make sure your path for the broom handle is straight up.
- You can then take your time returning the bar back to rack position, thus completing one rep.
- So our final workout of the day, we’re going to pick things up and put them back down. My little girls are doing this everyday, I tell them to pick their stuff up, and then I find it right back on the floor where it originally was, oh ya that’s basically a Deadlift!
- Again ensuring the weight is on your heels, your feet will be somewhere in between hip and shoulder width. In the Deadlift position you want your shoulders to be slightly in front of the broom stick handle, the handle up against your shins and back arched. Your arms should be locked straight down so that the broom stick is approximately 6 inches from the ground simulating plates on the end. Your hands will grip the bar so that your arms are just outside your knees, ensuring no interference during the lift.
- Thrusting up through your knees, extend your legs and hips (they should rise at the same time).
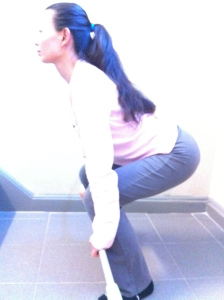
- Once the stick passes your knees, extend (open) your hips all the way up. The bar will stay in contact with your legs all the time, thus ensuring the weight is as close to your body as possible. Keep you head relaxed and eyes forward.
- Returning the broom stick back to the starting position, pushing the hips back and shoulders forward slightly, while delaying bending of the knee.
- Once you are back in starting position you have completed a rep, either drop the broom stick or start over for another rep.
- If it hurts to bend over that much, adjust your starting height, till you find your initial comfort level, then slowly move lower as your body adjusts to the workout. It doesn’t matter if it takes you some time for your body to adjust, safety first.
Again these three fundamental movements will prove to be important building blocks for other exercises and everyday movements such as sitting and standing, lifting things over your head, and picking things up & putting them down. Take a look at the links above and do these fundamental movements in front of a mirror ensuring you are doing them correctly. Try to do 3 reps of 10 for each movement, make sure you do not feel any type of soreness before attempting any type of weight with these movements. The point is to become proficient at these movements before putting weight on and possible hurting yourself.
I’ll place part two on in the future, hope this helps.
Cheers,
Christian
Leave a Reply